· Robert Mordzon · Experiments · 6 min read
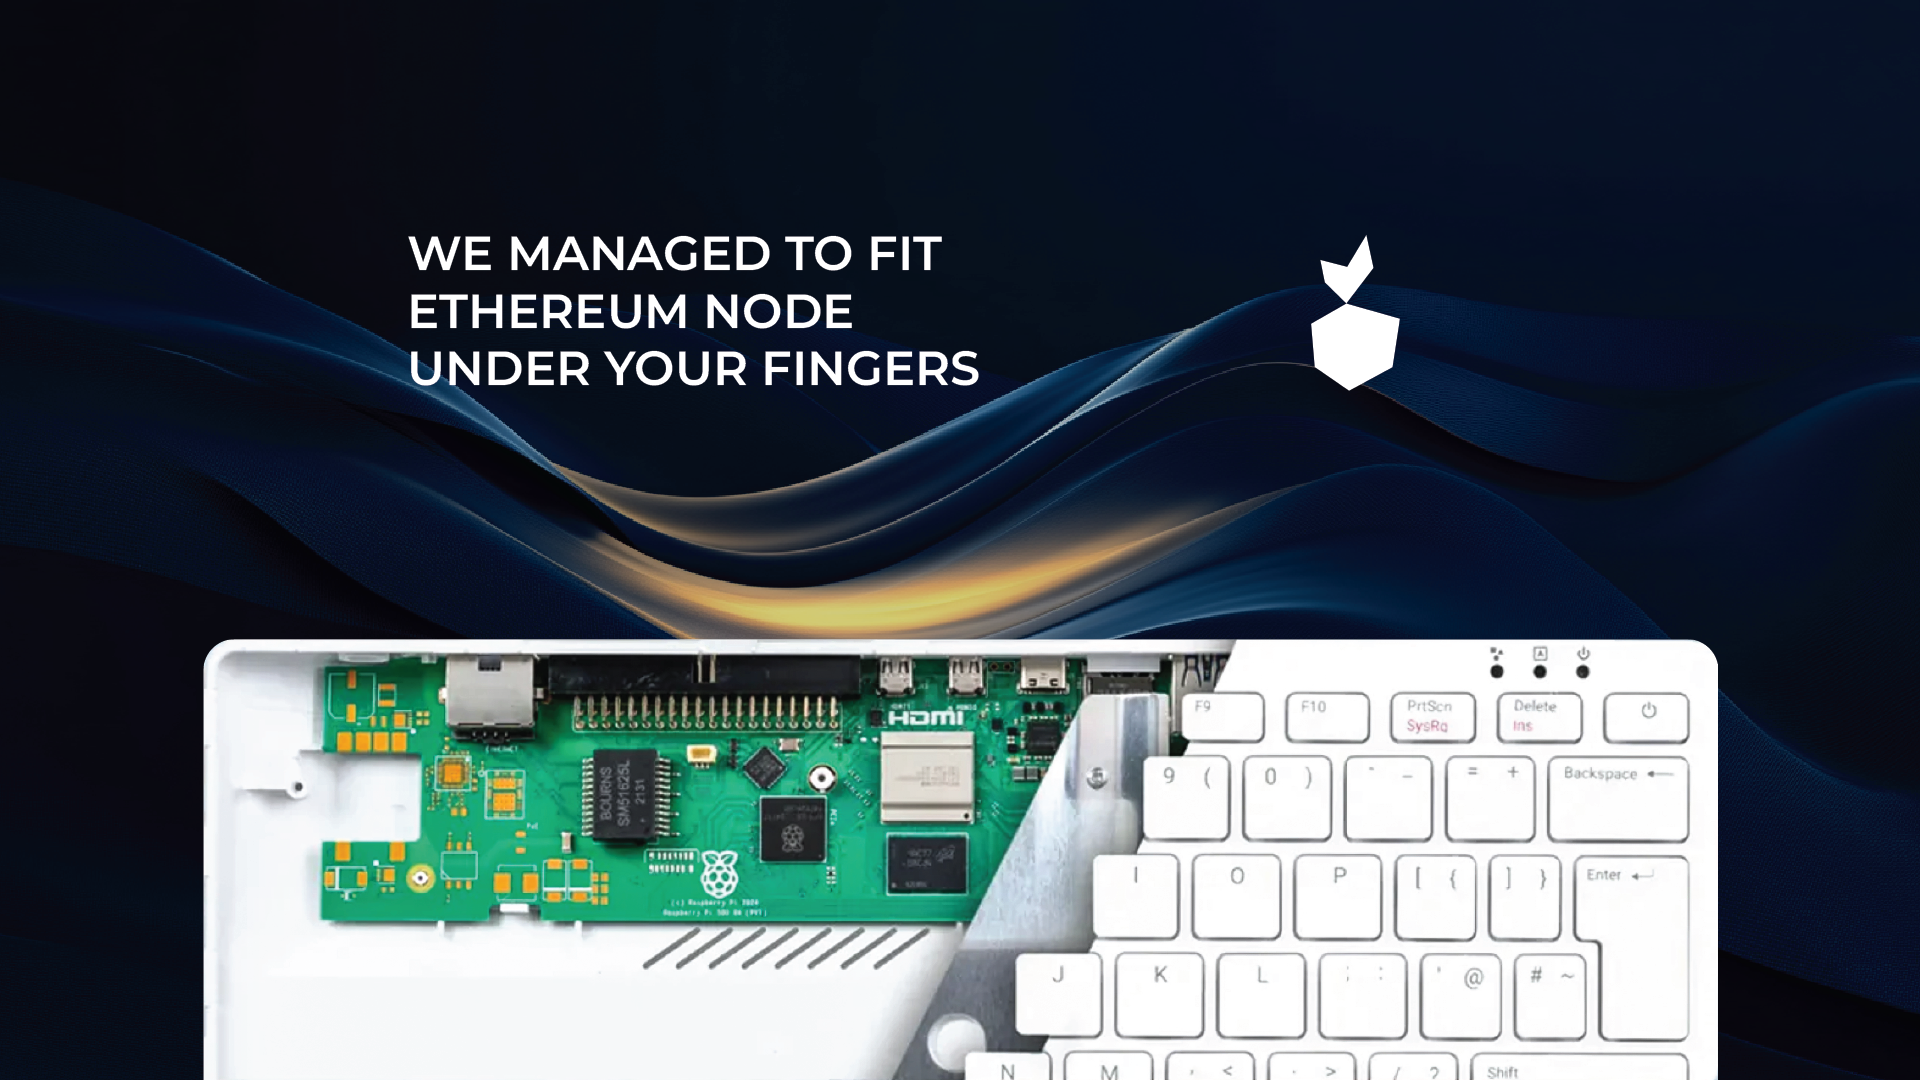
Ethereum node inside keyboard (Raspberry Pi 500)
We got Web3 Pi running on the Raspberry Pi 500! Though it launched without an M.2 slot, the PCB had the layout for it—just missing key parts. With some reverse engineering and soldering, we added an 2TB NVMe SSD, turning it into a full Ethereum node. Read more in our latest post!
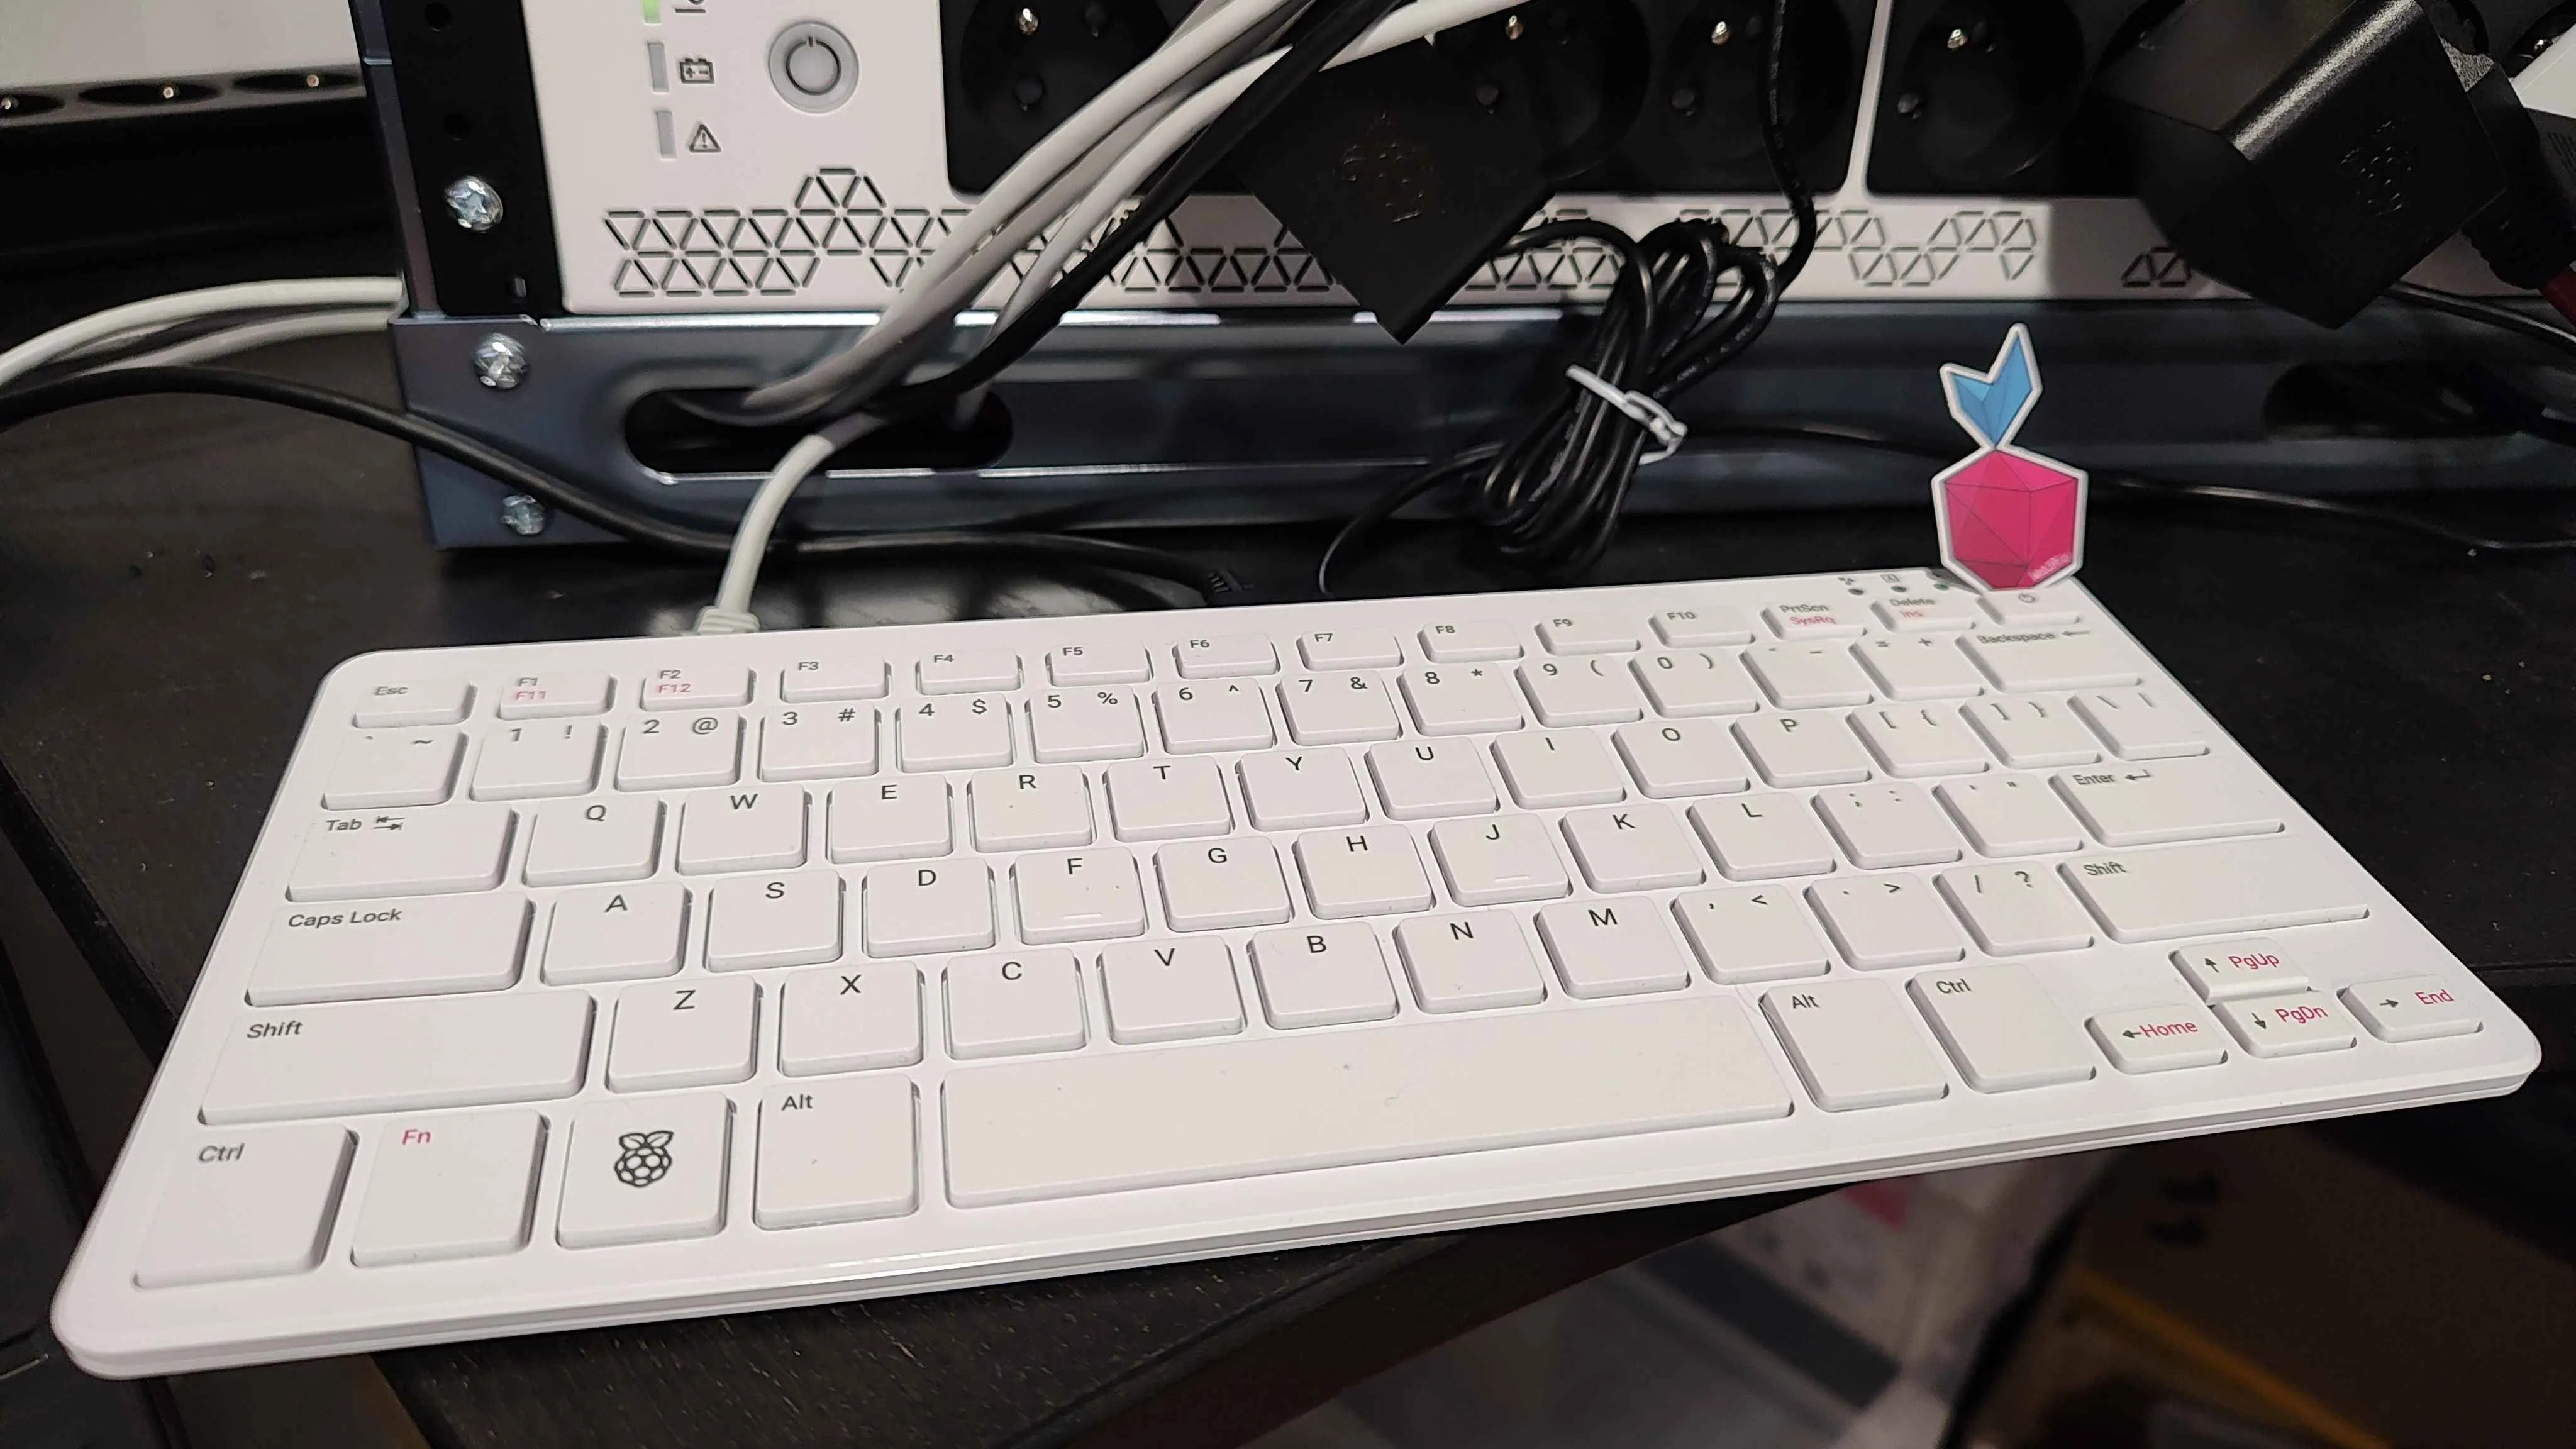
The Raspberry Pi 500 is an exciting piece of hardware—a full-fledged Raspberry Pi built into a keyboard. However, when it was released, one major limitation stood out: no built-in M.2 storage support.
But here’s the twist—the PCB actually has the layout for an M.2 slot. It’s just missing key components. Naturally, I had to investigate. Was this an intentional decision, or was there a technical reason behind it? As a challenge (and out of pure curiosity), I decided to complete the design and see if M.2 storage would actually work.
The Hidden M.2 Slot on the Pi 500
When I finally got my hands on a Raspberry Pi 500 and opened it up (which, by the way, is difficult to do without damaging the edges), I could take a closer look at what was missing.
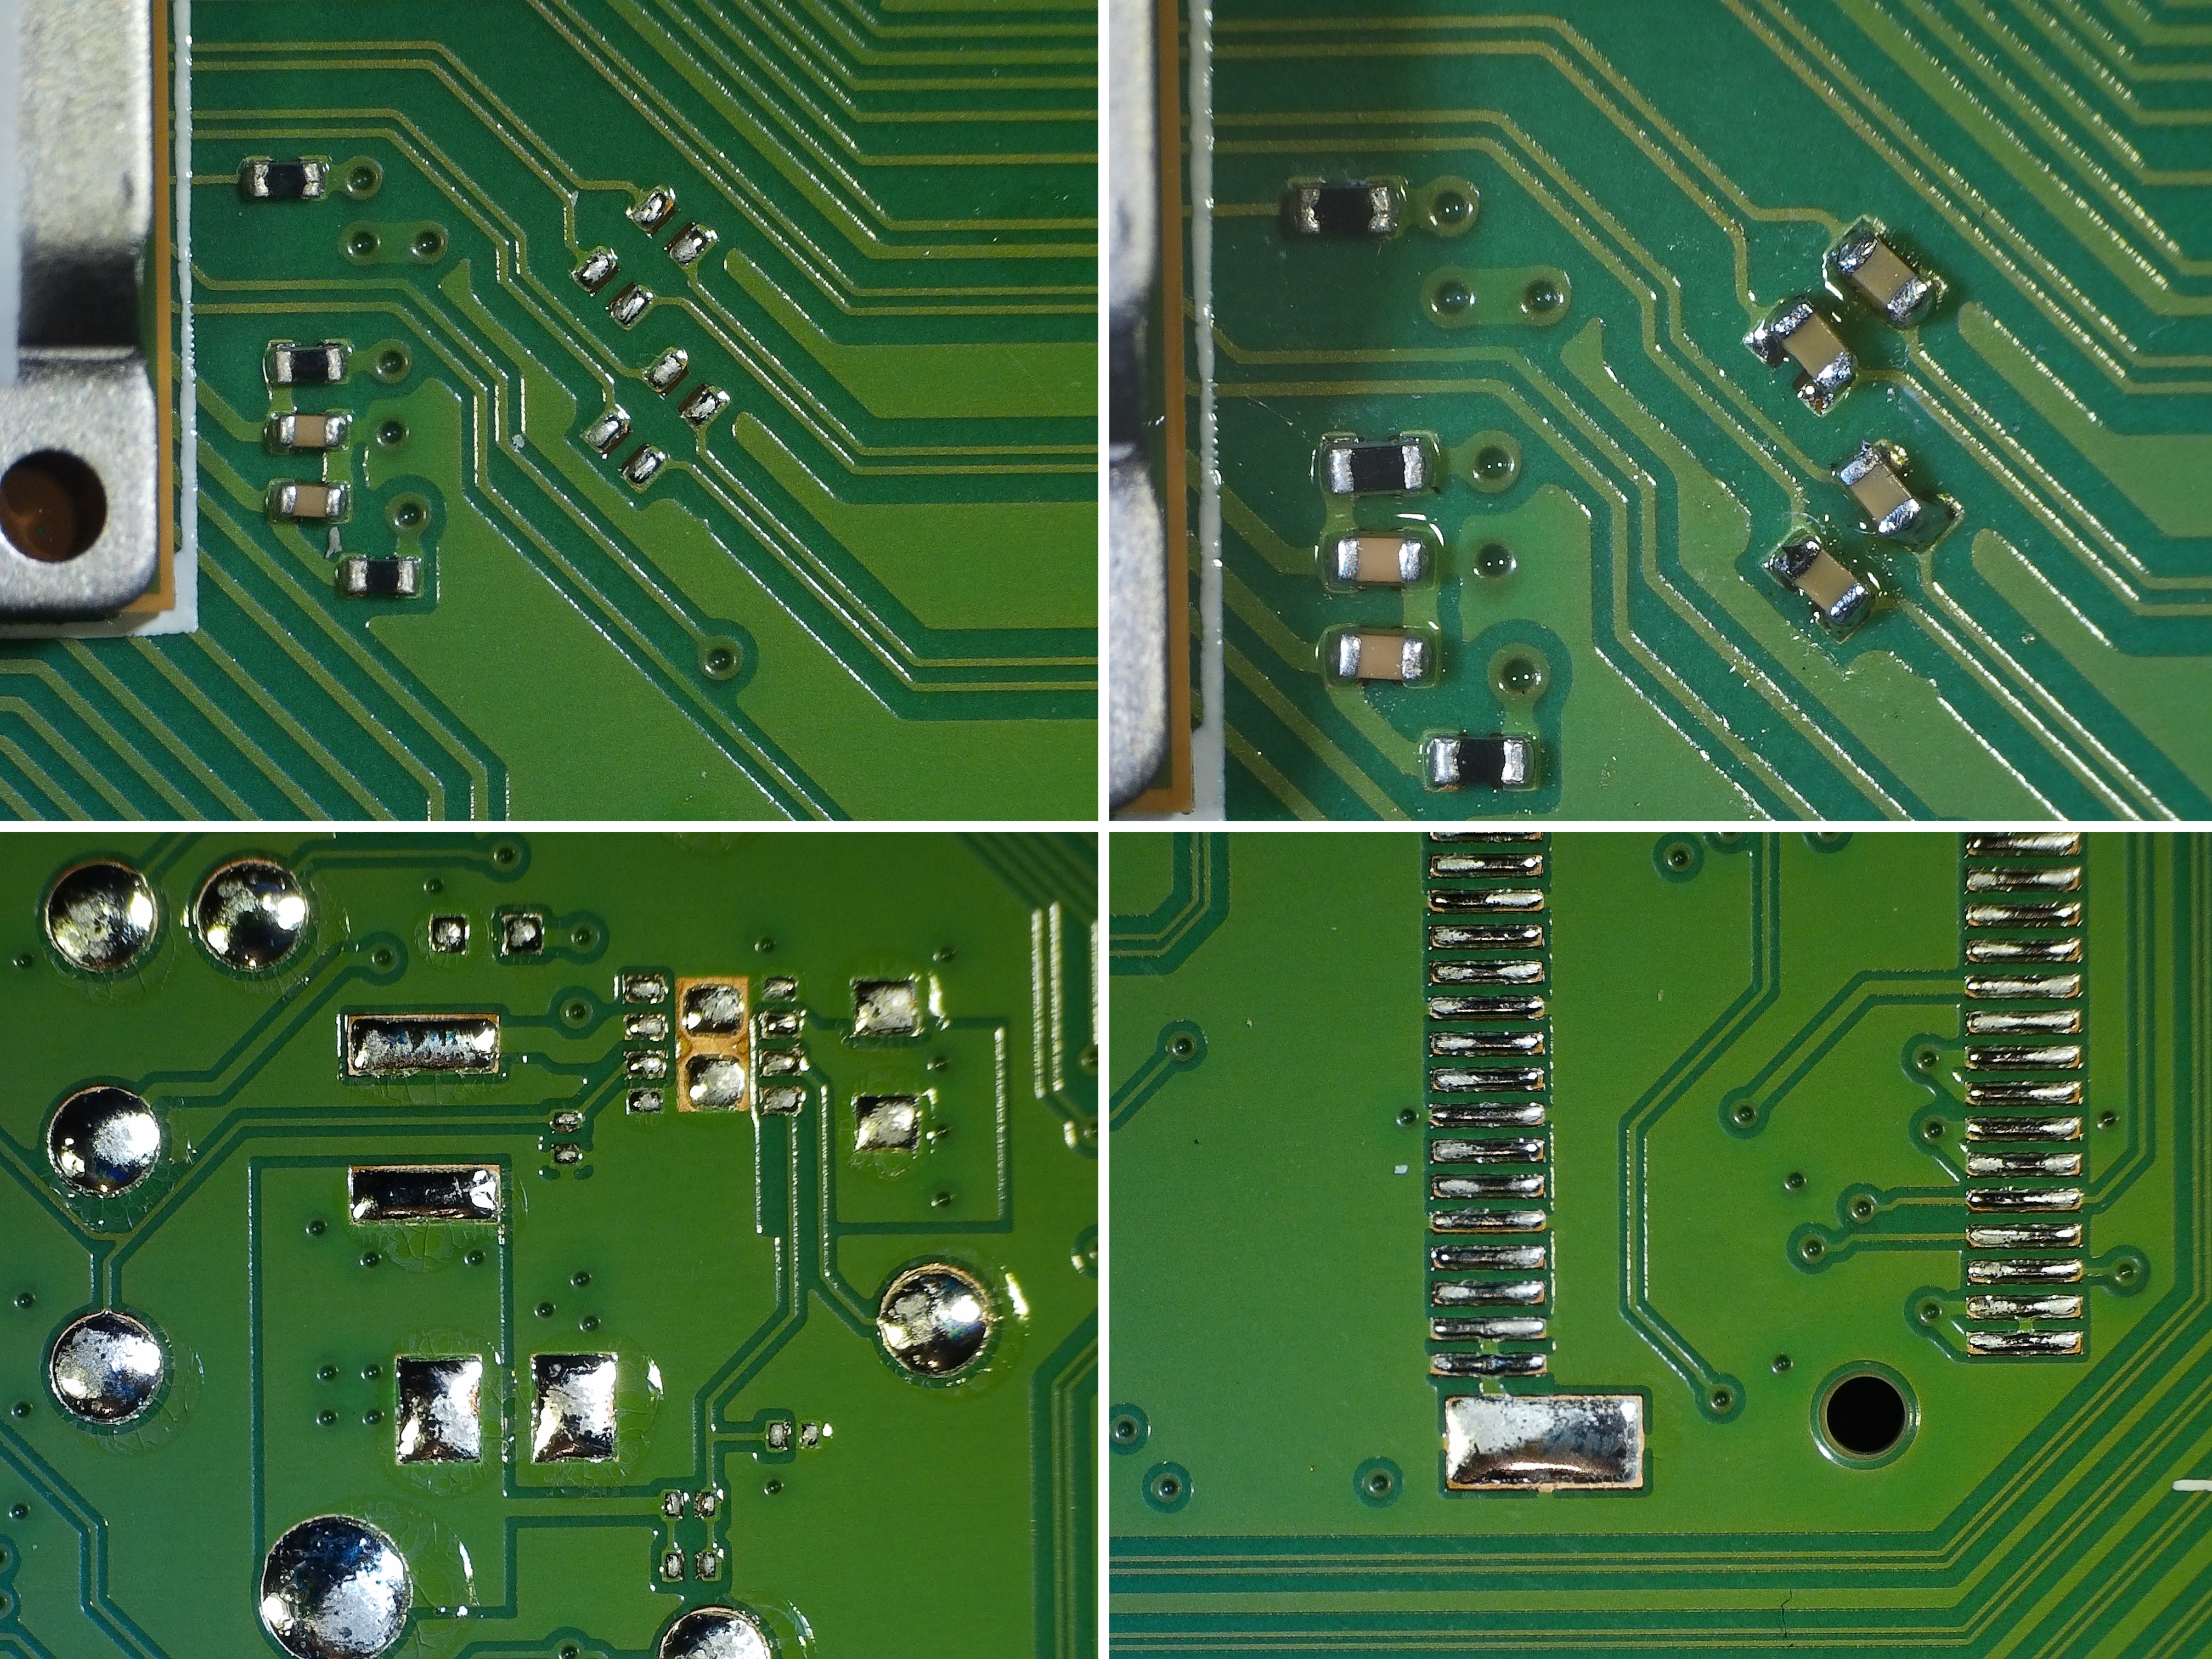
- The PCB has a designated footprint for an M.2 slot, but the connector is missing.
- Key resistors on the PCIe data lines are absent.
- The power management circuitry for NVMe drives isn’t populated.
- Interestingly, there’s also a PoE (Power over Ethernet) section that lacks components.
This raises some intriguing questions:
- Did something go wrong during development, causing Raspberry Pi to remove these features at the last minute?
- Was this a cost-cutting measure, or are they planning to release a future model—maybe a Raspberry Pi 500 Pro with M.2 support?
- Could it simply be that they didn’t want to deal with support issues, especially since the case isn’t designed for easy opening?
Whatever the reason, one thing was clear—I had to try enabling M.2 myself.
Adding M.2 to the Raspberry Pi 500
Since I have experience with electronics and precision soldering, I decided to reverse-engineer the missing connections and manually install the components. This involved:
- Tracing the PCIe data lines to identify missing resistors.
- Sourcing and soldering the M.2 slot, communication resistors, and power circuitry.
- Installing a 2TB NVMe SSD and testing if the system recognized it.
For storage, I used a 2TB Micron 2400 NVMe SSD in the compact 2230 form factor. This drive was a perfect fit for the Raspberry Pi 500, as it is exceptionally power-efficient and generates very little heat—a crucial factor given the passive cooling design of the device.
Interestingly, the PCB layout actually allows for larger M.2 drives up to 2280 size, meaning there’s flexibility in choosing different SSDs depending on power and thermal considerations.
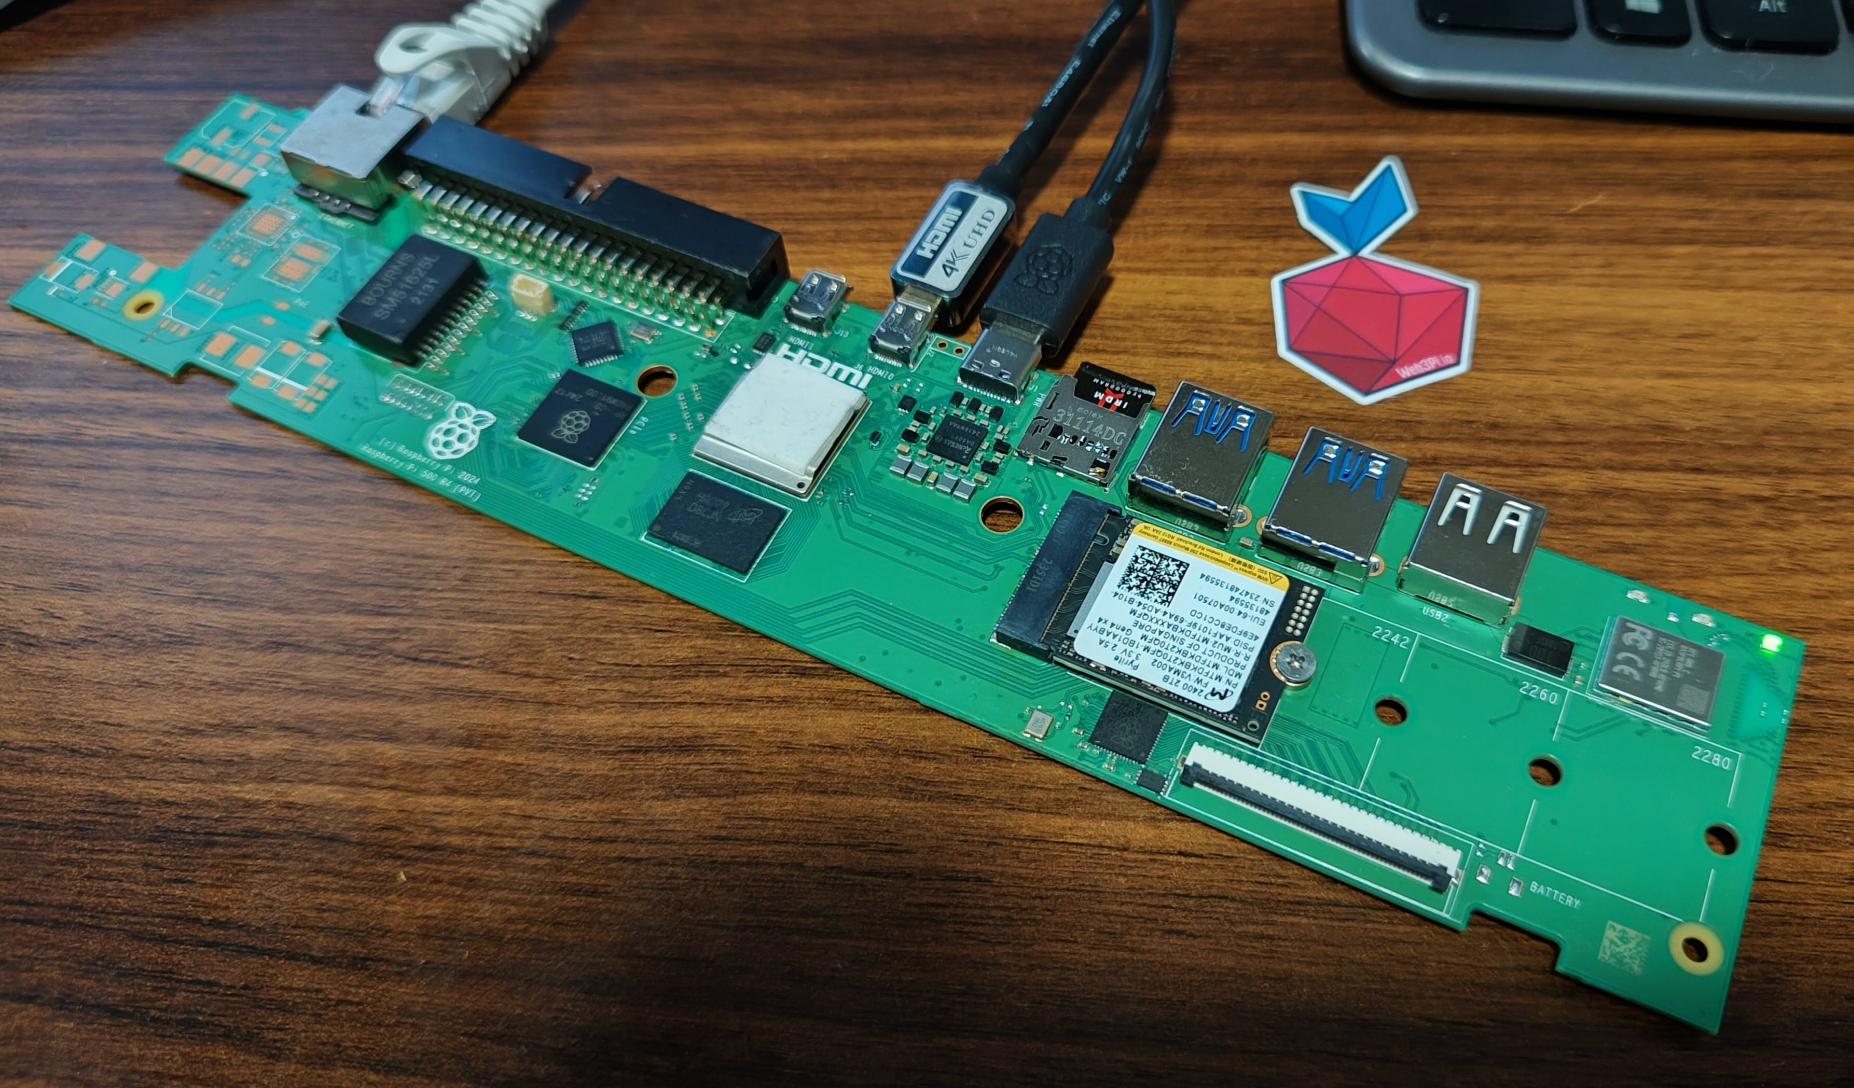
The SSD operates seamlessly at PCIe Gen 3 speeds.
A Difficult Modification – Not for Beginners
While this modification is technically possible, I would not recommend attempting it without significant soldering experience and the right tools.
The missing components are extremely small, with some, like capacitors and resistors, being as tiny as 0201 size. Additionally, the PCB has a thick copper layer, which absorbs heat from the soldering iron, making the process even more difficult. Even for experienced electronics engineers, this is a challenging mod.
Luckily, I have a Digital Microscope Andonstar ADSM302, which made the job much easier. For soldering, I use my favorite iron, the Xytronic LF-3200 (120W), and for ICs, I also rely on a WEP 853AA hot air station. A good flux is also essential—I’m using Alpha RMA-7 Flux Gel, which works great for this kind of work. So while it’s an interesting experiment, this is not a beginner-friendly soldering job!
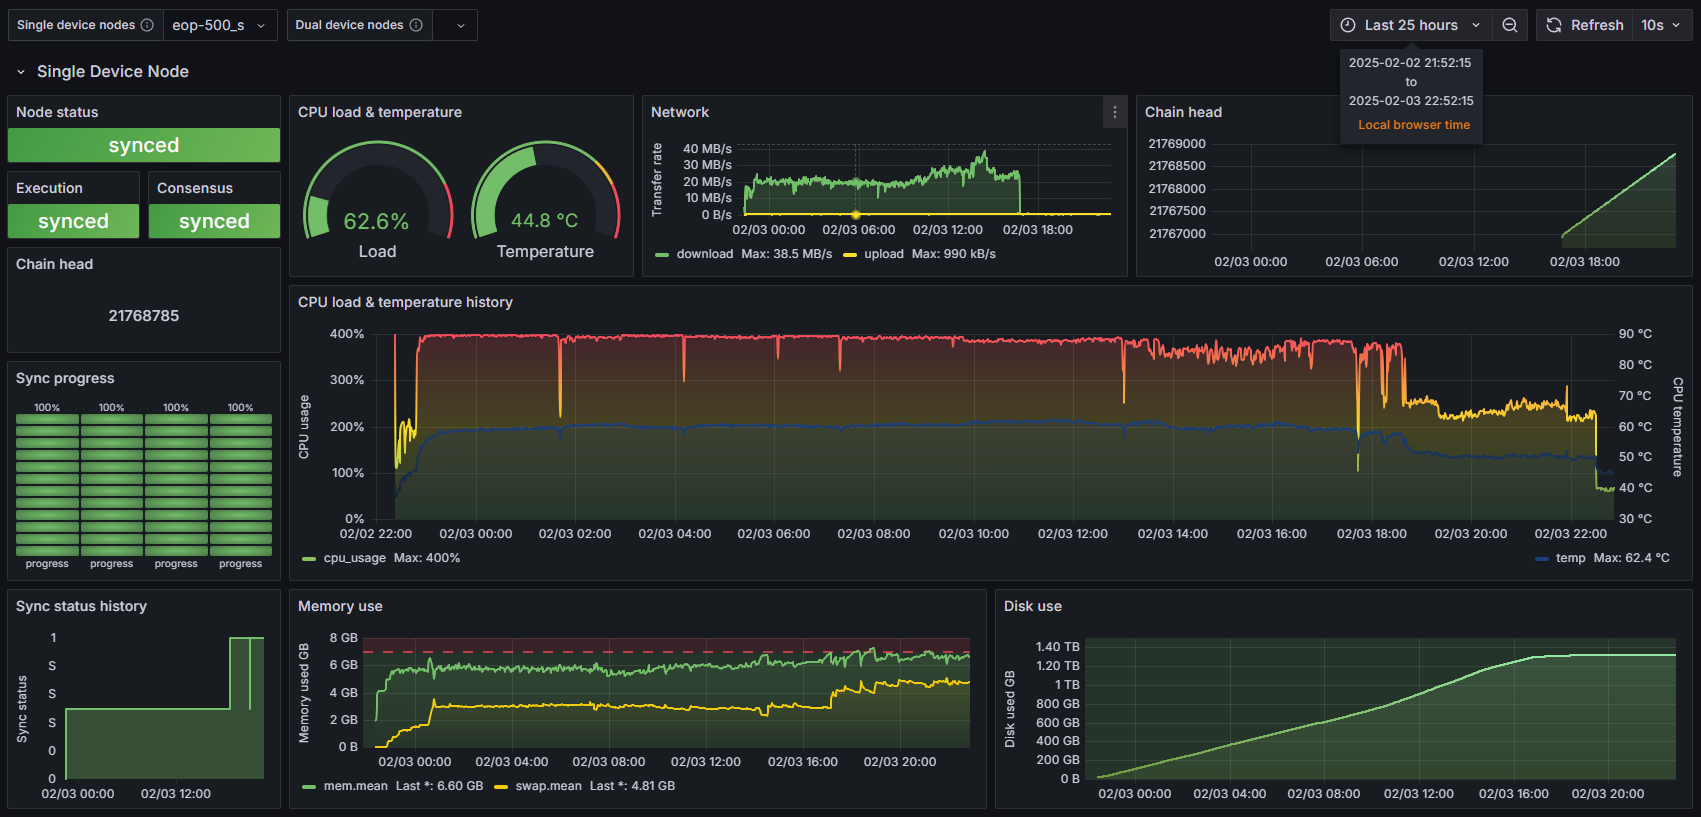
Putting It to the Test: A Full Ethereum Node in a Keyboard
With 2TB of NVMe storage installed, it was time to see if the modded Pi 500 could handle a full Ethereum node. The Web3 Pi setup went smoothly, and synchronization began.
While monitoring performance, I made another interesting discovery—the passive cooling solution inside the Pi 500 works surprisingly well. Instead of an active fan, the processor is cooled by a large metal plate mounted under the keyboard.
Even during Ethereum blockchain synchronization—20+ hours of 100% CPU load—this passive cooling kept temperatures stable at around 60°C. It turns out that the large surface area of the metal plate does an impressive job of dissipating heat.
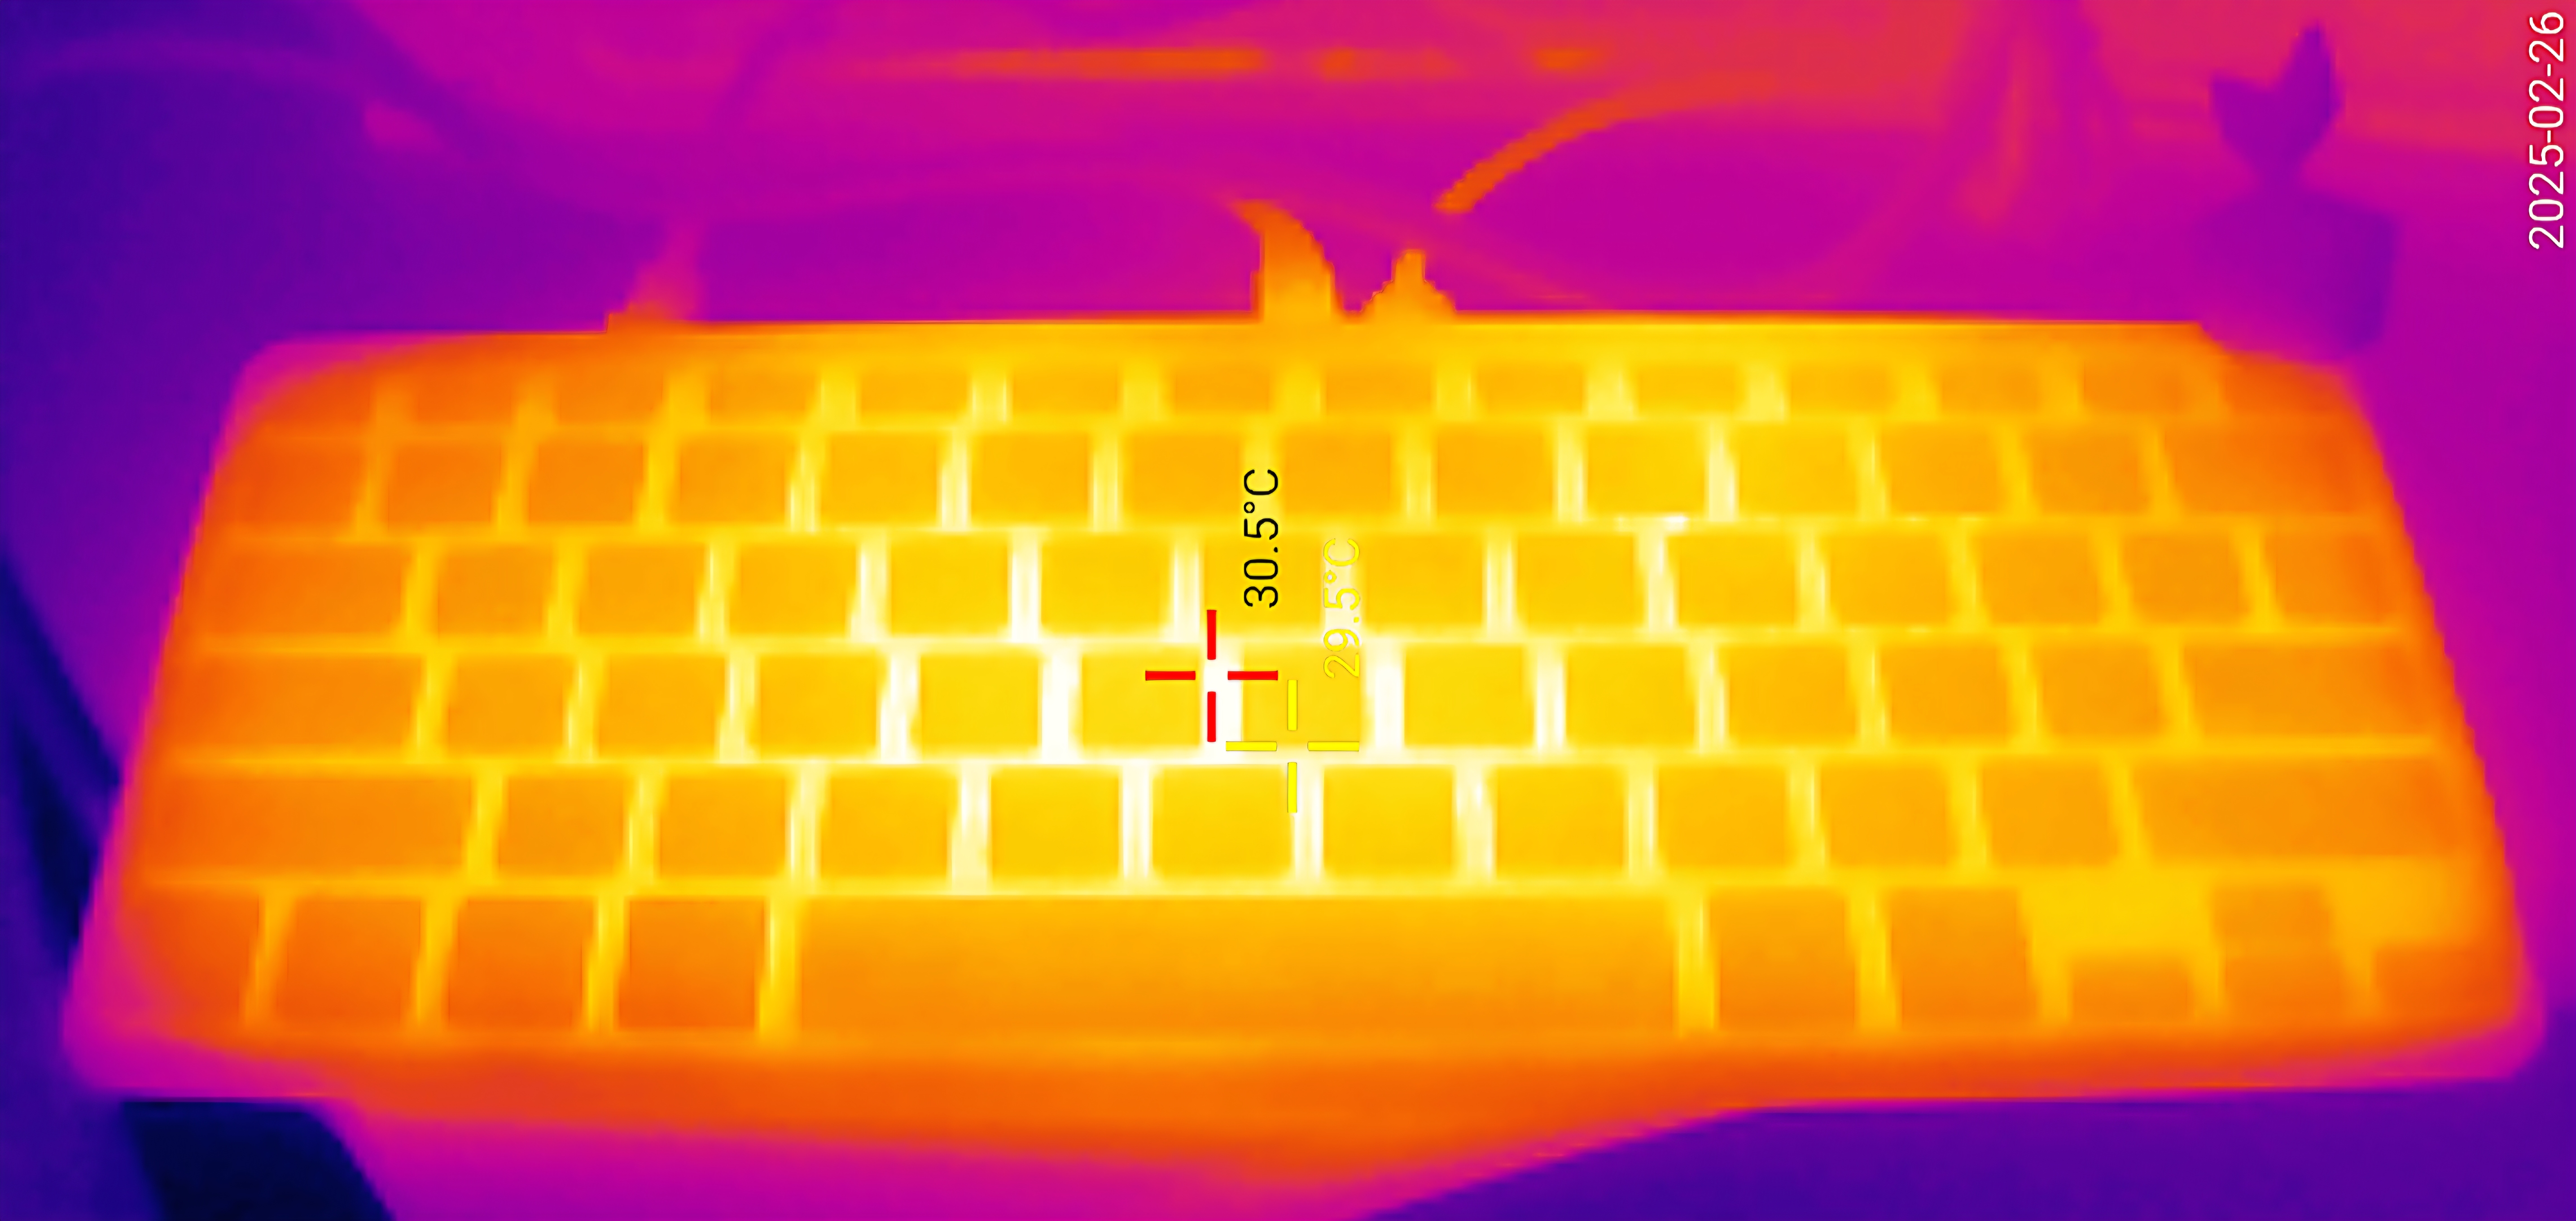
I jokingly call this mod: “A keyboard heated by Ethereum”. 🔥⌨️😆
BOM – Bill of Materials
Main Components:
- M.2 Connector – 1 pcs | TE Connectivity | 1-2199119-5
- 3A Step-Down DC-DC Buck Converter – 1 pcs | Diodes Incorporated | AP3441SHE-7B
- Inductor 2.2 µH 2.3 A 90 mΩ – 1 pcs | Vishay / Dale | IHHP0806ZHER2R2M01
Resistors:
- 2.2kΩ (0201) – 1 pcs | Panasonic | ERJ-1GNF2201C
- 10kΩ (0201) – 1 pcs | Panasonic | ERJ-1GNF1002C
- 100kΩ (0201) – 1 pcs | Panasonic | ERJ-1GNF1003C
Capacitors:
- 4.7nF (0201) – 1 pcs | Murata | GRM033R71A472JA01D
- 22µF (0603) – 1 pcs | Murata | GRM187R61A226ME15D
- 47µF (0805) – 1 pcs | Murata | GRM21BR61A476ME15K
- 220nF (0402) – 4 pcs | Samsung | CL05Y224KO5VPNC
- 220nF (0201) – 4 pcs | Samsung | CL03X224KQ3NNNC
- 100nF (0201) – 1 pcs | Murata | GCM033C71A104KE02J
- 10µF (0402) – 2 pcs | Murata | GRM155R61A106ME11J
Notes:
- The last two capacitors (100nF and 10µF) may not be necessary.
- I’m not sure whether I used the 220nF capacitor in 0201 or 0402, so both are included in the BOM.
- M.2 connectors are available in different heights. The one I used is low-profile, but a slightly taller version can be ordered if needed, for example, when using an SSD with memory chips on both sides of the PCB.
- All components were ordered from Mouser.
For assembly, I recommend Mirek’s schematic: View it here.
Final Thoughts: What’s Next for the Pi 500?
This experiment proved one thing—the Raspberry Pi 500 is fully capable of supporting NVMe storage. Whether Raspberry Pi releases an official M.2-equipped version remains to be seen. Until then, modders like us have shown that it’s possible.
Found this mod interesting? Share this post to show others what’s possible with the Raspberry Pi 500!
Related Links
For those interested in delving deeper into this topic, here are some related articles and resources:
- Pi 500: Faster, but no M.2 – Jeff Geerling on Pi 500’s speed and missing M.2.
- Adding an M.2 Slot – A successful M.2 mod for Pi 500.
- Pi 500 Teardown & Review – Jeff Geerling’s first look at the Pi 500.
- Enabling NVMe on Pi 500 – Hackaday on restoring PCIe support.
- The Missing M.2 Slot – Why was the M.2 slot removed?
- Choptec’s NVMe Mod – Pi 500 mod shared on X (Twitter).
- CM5 IO Board Datasheet – PCIe specs for Compute Module 5.
- Pi 500 Hardware Teardown – A detailed teardown of the Pi 500.
- Forcing PCIe Gen 3 on Pi 5 – Exploring faster PCIe speeds.
- Mirko DIY’s NVMe Mod – Reference schematic from Mirko.
- r/electronics – My Reddit post 1.
- r/RASPBERRY_PI_PROJECTS – My Reddit post 2.